
|
Build Automator Documentation
Project Window |
|
Previous
Top
Next
|
|
|
The Project Window is the main work window of the Build Automator's IDE. This is where you create your automation project.
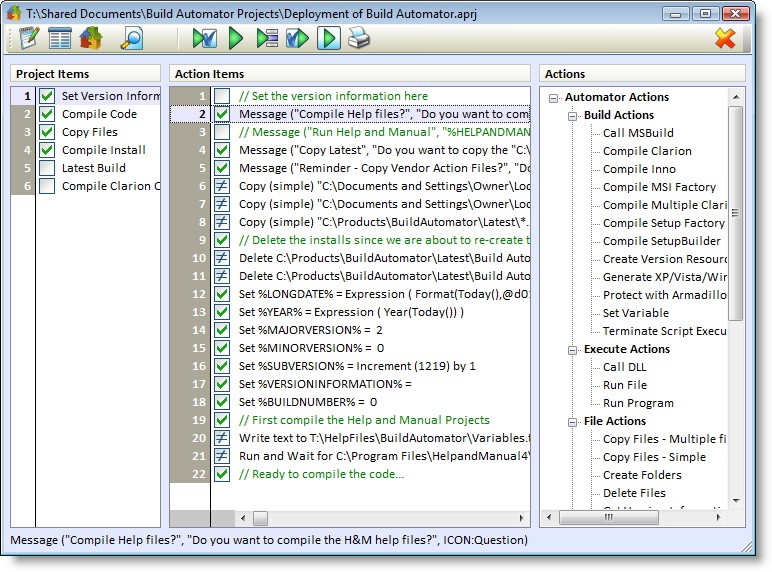
On the left are Project Items. This is a way for you to group together related actions, such as copying of files, or compilation of code. On the right are the Actions that are available for use. Double click on the action to insert it into the Action Items list for the selected Project Item. Each action has an update window that will be displayed when the Action Item is created. The checkboxes on the Project Items and Action items list control is that particular item will be executed or not. Double click on the checkbox to toggle between checked and unchecked. This way you can quickly exclude or include sections of the project. Right click on the Actions Items list, or use the Application Key on the keyboard, to to bring up a popup menu.
You can change the size of the Project Items, Actions Items and Actions lists by placing the mouse between those elements and click-and-drag to change the sizes. A splitter bar wills how up between the controls and allow you to change the sizes.
At the top of the window is a toolbar with several buttons that affect the project and the item list.
![]()
|
Opens the Project Properties window. |
|
Opens the Project Variables window |
|
Opens the Create Shortcut window |
|
Opens the Log File Viewer window with the last logfile |
|
Executes all Action items from the start of the script up to and including the selected item. If the Execute All is selected, it will start with the first Project Item. If Execute Project item is selected, it will start at the first Action item in the selected Project item and end on the selected item. |
|
Executes all Action items from the start of the scrip to the finish. If the Execute All is selected, it will start with the first Project Item. If Execute Project item is selected, it will start at the first Action item in the selected Project item and end on the last Action item. |
|
Executes all Action items in the selected Project Action item. |
|
Executes from the selected item to the end. If the Execute All is selected it will execute from the current Action item to the final Action item in the last Project Item. If the "Execute Project item" is selected it will execute from the current Action item to the last Action item in the selected Project Item. |
|
Executes the selected item. If multiple items have been selected it will execute all selected item. If only one item is selected it will execute only that one item. |
|
|
|
Move the selected item up. Alt-Up-arrow key. |
|
Move the selected item down. Alt-Down-arrow key. |
|
Closes the Project. If the project has changed you will be prompted to save if it has changed since you saved last time. |
Each Project Item and Action Item can be checked or unchecked. When unchecked the item will be excluded from execution. Each Action Item can also be conditional. In that case a checkbox with ≠ is shown instead of the checked or unchecked boxes. See screenshot below. The top Action Item is unchecked and would not be included in execution.
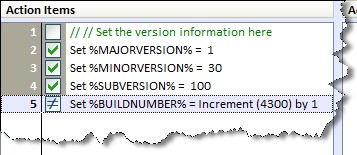
The bottom item is a conditional item, indicated with the ≠ in the checkbox. When a condition is present, the Action Item is displayed at the bottom with an IF (condition) THEN statement - see screenshot.

You can use variables in the conditions, but the condition must result in a logical true or false statement. The condition is evaluated and if the result is either an empty string or numerical zero, the Action Item is not executed. If any other values are returned by the evaluation of the condition, the Action Item will execute.
If you click with the right mouse button, or press the Application Key, on the Project Items list the program will show you a popup menu.
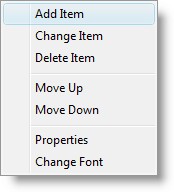
You can use this popup menu to easily Insert, Change or Delete the selected Project Item. The Change Font will bring up a font selection window where you can select whatever font you are comfortable with for the Project Items list.
If you click with the right mouse button, or press the Application Key, on the Action Items list the program will show you a popup menu.
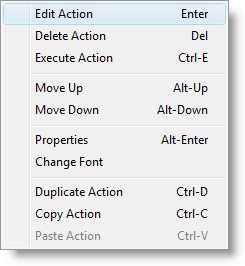
You can use this popup menu to easily Insert, Change or Delete the select Action Item. The Properties option will bring up the Action Items Properties window. The Change Font will bring up a font selection window where you can select whatever font you are comfortable with for the Actions Items list.