
|
Build Automator Documentation
Write text to file |
|
Previous
Top
Next
|
|
|
This action writes the text entered to a specified text file. This can be very powerful when combined with compilers to change project settings before a compile, then change them again before another compile, for example to compile different variations of the same program.
Version 2.0: December 7, 2013. You can now use Include to include files inside the text.
Properties |
Explanation |
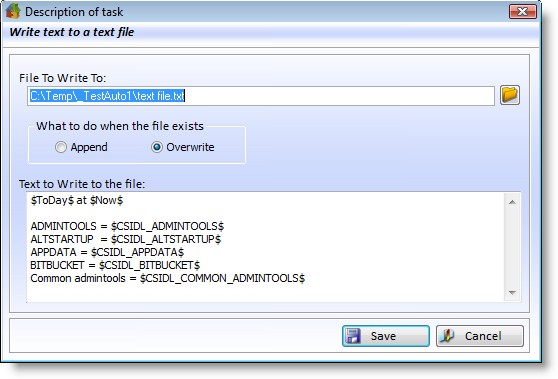
File to write to |
The name of the file to write the text to. If the path does not exist when the action is run, the folder structure is created automatically. |
What to do... |
This action can either overwrite the file if it exists, or it can append to it. |
Text to Write |
Enter the text to write. The text is currently limited to 10K, but if you use variables in the text, please allow for room to expand them. |
The above settings produce a text file like this (this will not format properly in the PDF manual because the lines are too long):
2015-09-15 at 15:19:32
ADMINTOOLS = C:\Users\User Name\AppData\Roaming\Microsoft\Windows\Start Menu\Programs\Administrative Tools
ALTSTARTUP = C:\Users\User Name\AppData\Roaming\Microsoft\Windows\Start Menu\Programs\Startup
APPDATA = C:\Users\User Name\AppData\Roaming
BITBUCKET =
Common admintools = C:\ProgramData\Microsoft\Windows\Start Menu\Programs\Administrative Tools
INCLUDE
By using Include() you can now include other files in the text. This allows you to build files, such as code files on the fly before compiling. Note that the {#INCLUDE( )} statement MUST be in upper case. The filename must be enclosed in double quotes. Single quotes will not work. The whole statement is enclosed in curly brackets. Note that no spaces are allowed in the {#INCLUDE()} statement except in the filename. Here is an example of a text that I use to construct Clarion template that exports classes and methods:
#!! --------------------------------------------------------------------------------------
#!! Icetips Outlookbar Template file
#!! ##COPYRIGHT##
#!! This file can not be distributed in any way by anyone except Icetips Alta LLC
#!! ##VERSIONINFO##
#!! --------------------------------------------------------------------------------------
#!!
#!---------------------------------------------------------------------------------------
#PREPARE
#CALL(%ReadABCFiles(ABC))
#CALL(%SetClassDefaults(ABC), 'ITAuto', 'ITAuto', %ClassName)
#SET(%ITATemplateName,'Icetips Automator Classes Global')
#ENDPREPARE
{#INCLUDE("%EXPORT_FILE%")}
%EXPORT_FILE% is set earlier in the script to point to an automatically generated .exp file that is then included in this .TPW file before it is included in the distributed product.
Example use in Clarion:
Let's say that you need to compile 3 different models of the same application. You can do that easily by using a project #define that you then use in COMPILE and OMIT statements.
In your code you have these 3 equates:
MODEL:Standard
MODEL:Professional
MODEL:TeamProject
You decide to use _Model_ pragma define in your project and it could be set to 0, 1 or 2 for the 3 different MODEL: values in that order. In your code you can now have something like this, for example in the "After Program Code" global code embed:
COMPILE('***Standard***',_Model_=0)
Glo:Model = MODEL:Standard
***Standard***
COMPILE('***Professional***',_Model_=1)
Glo:Model = MODEL:Professional
***Professional***
COMPILE('***TeampProject***',_Model_=2)
Glo:Model = MODEL:Standard
***TeampProject***
You create a file called ModelProject.prj You don't have to put anything into it, or you could put:
#pragma define(_Model_=>0)
into it to test with. Save the file and go back to your Clarion application and add the ModelProject.prj to your application project under "Projects to include". Now you have this all set up to make the Build Automator do the rest for you.
You can now combine this in a single script in the Build Automator:
// Create the Standard executable
WriteTextToFile: #pragma define(_Model_=>0)
Compile Clarion: MyApp.app
Rename File: MyApp.exe -> MyAppStandard.exe
// Create the Professional executable
WriteTextToFile: #pragma define(_Model_=>1)
Compile Clarion: MyApp.app
Rename File: MyApp.exe -> MyAppProfessional.exe
// Create the TeamProject executable
WriteTextToFile: #pragma define(_Model_=>2)
Compile Clarion: MyApp.app
Rename File: MyApp.exe -> MyAppTeam.exe
The WriteTextToFile changes the #pragma in the project that is included and forces the compiler to set the Glo:Model to the appropriate value. Now you can check Glo:Model in your application and it will tell you what program you are running. Instead of renaming the file you may want to copy it to a different install folder or copy it to an install folder and run SetupBuilder on it and specify a different install name based on what option you are using. I.e. the .exe name would be the same from Clarion, but the .exe name created by SetupBuilder would be different. This gives you a LOT of power with one very simple action!